Tuesday, June 25, 2013

精致/"너보고싶어"메니큐어/すてきネイルアト

One of my friends just moved back to the US from China so I designed a special nail design commemorating it. With this design I tried to respect her Chinese heritage and design a look for her based on things she likes as well as where she returned from. My inspiration: Chinese brush painting, koi fish, and the Asian knack for liking cute things.
わたしの友だちは中国からきました。かのじよはアメリカきました。 とてもうれしすです! 日本語がかくこと むずかしいです。じつは、ここにネイルアート チユト-リアル!

Nail Design on paper

Base Colors

Right Hand 右 

Left hand 左 
Colors you need: Pink (hot or pastel), White, Black, Parchment (vanilla frosting), Silver, Blue.白,色, パンク, 色, 銀色파랑색, 하얀색, 검정색, 실버, 핑크. For designs: Red, Yellow (Sally Hansen Lightening), Green, Orange
Additional accessories: 1 fake plastic gem, blue sparkles

Left Hand Thumb 手 Koi Fish金魚

1) paint the outline of a koi fish in black then add in the details, scales, fins, the eye and bubbles
2) paint orange over the outline, the only part to worry about is the eye- make sure that doesn't get covered up
3) Paint blue around the fish and while the paint is still wet dump sparkles. Your fish should be dry by then so the sparkles will mostly be on the "water"
4) Done!
I'm never quite sure when this will turn out, but this one is pretty cute. Just not my best!

Left Hand Index Finger- Dripping Strawberry Ice Cream

1)http://www.youtube.com/watch?feature=player_detailpage&v=YWOB6FdK01o I did this my own way but used a smaller dotter as well as adding some drips and using different colors. I also added extra sprinkles outside the ice cream. Watch the tutorial then look at mine and decide which one suits your style better, K?

Left Hand Middle Finger- Tuxedo

1) Paint the blue suit first- For variation use white instead of the parchment color I used
2) Paint an X (you should know this tutorial already from my first Super Junior tutorial)
3) Paint the lapel with black
Here's a link to the Cutepolish tutorial (again) http://www.youtube.com/watch?feature=player_detailpage&v=nn5epUw3100

Left Hand Ring Finger- Asian Ladyアジアン

1) Paint a white face shape and neck- let that dry
2) Using a thin black (nail brush would come in handy here) paint on her eyes, eye brows and nose
3) Using the nail brush with a sparkly red paint on tiny lips
4)Use a white to outline her hair and parasol
5) Paint the parasol red
6) Paint white flower petals around her then paint lines on her parasol so you can tell what it is
7) Splash silver paint across the tip of the nail
目がくりくりしています.

Left Hand Pinky Finger- APINK stripes

1) Paint the stripes on with White
2) Paint pink over the white stripes

Right Hand Thumb- Clouds and Chinese characters漢字

1) Use a nail brush and black to paint on clouds- Chinese style. I looked at art from a Calligraphy book and the movie Mulan then did my own
2) Using a red and your nail brush paint on the Chinese characters you see on the nail, Friend, Forever, and Good Fortune in the clouds

Right Hand Index Finger

1) Same as left hand index finger

Right Hand Middle Finger

1)Paint two wide white stripes on the black. Paint the outline of a heart in white on the right stripe.
2) Paint silver over the stripes (optional)
3) Paint red over the heart (or another color, but red looks best)

Right Hand Ring Finger- 漢字, fan, and flowers

1) So this you will not see on the design I wrote originally. It's the Chinese character for fresh and I basically did it calligraphy style- look up youtube videos on how the Japanese write calligraphy the style is called Ts'ao tzû (yes the tone is wrong there, lack of Chinese keyboard) or "grass characters". It's really difficult to read so it's mostly for art. Look up the Chinese character for fresh and do it in the Korean/Japanese style- this is located at the top right corner of the nail.
2) Paint the fan in red and add flowers to the design, paint a design on the fan in white, outline the wood of the fan in black. (this is probably one of the coolest Asian designs I've ever done! ^_^ and to think it was supposed to look like bamboo brush painting! Ha!)

Right Hand Pinky Onedirection Stripes

1) Paint stripes that meet in the middle, like upside down triangles
2) Using clear polish attach a gem to the pinky at the tip and center of the nail
3) Using a really really small gem makes this look even better

Final Look!精致

Isn't it beautiful?

Sunday, June 9, 2013

슈퍼주니어 메니큐어 Super Junior Nail Art

슈퍼주니어 메니큐어 Super Junior Nail Art 

Link to the MV- http://www.youtube.com/watch?feature=player_detailpage&v=4GpJHF0WyAE

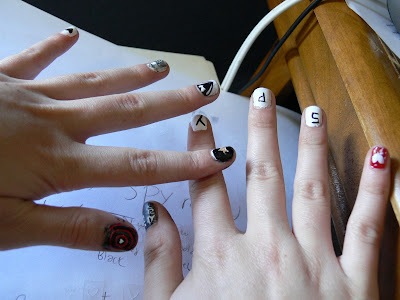
This is the design I drew up for their MV Spy, I suggest you watch it before you do this because the song is really good! Plus it shows that I was really inspired... Just a hint ^_^

For Base Colors you need: White, Black, Red, Silver, Gold- 빨강색,검정색, 하얀색: 黒,赤,白, 金色,  銀色

1)Paint your nails as neatly as you can (word to the wise, if you use the Kiss Nail art thin brush nail polish never use it anywhere when a fan is on because it goes goopey after 4 uses or when a fan is on- this is my second set! Also don't paint a top coat on it if you can possibly avoid it because it will get spider web cracks under the clear topcoat)

Base Colors: your hands should look like this only neater- any polish that gets on your skin (if you do this yourself I can almost guarantee that will happen) will be gone in two days so focus on what's on your nail


Right hand

Design Layout


Steps

Left Thumb Target: The Spy I love
1)  Use a nail brush (mine is from Sephora- word to the wise never EVER drop it in Acetone nail polish remover because that will strip the paint off. Don't ask how I know, please) Paint three circles to form a target in WHITE. In the center of the middle paint a small white heart.
2) Paint red using your nail brush to COMPLETELY cover the white circles- trust me it will still look okay if you get a tiny bit on the black- if you leave some white? Not so much. So take your time. It takes me maybe five minutes if I concentrate and play music. Leave the heart white so it will end up looking like this
3) Top coat
You know this is cute- don't be in denial귀여워
Left Index finger Star from that hat
1)Use the nail brush to paint a star in gold centered in the middle of your finger, as big or small as you want.
2) Paint black all the way around the star except for a white crescent where your cuticle normally is (unless you do manicures)
3)Top Coat
It will look like this- I smudged mine trying to fish my nail brush out of the evil-horrible-diabolical-annoying-nailartbrush eating-wicked Acetone (I think that rant was long enough to fit my level of sadness) 
Left Middle Finger- Tuxedo
1)Paint the white Tuxedo first (look at the picture before you do anything: for reference you can use my picture or this link http://www.youtube.com/watch?v=nn5epUw3100 Cutepolish)Start with the body of the suit and fill it in. Then once you have the body paint an X a few cm below your cuticle and fill in the sides for the bow tie- please don't make that HUGE or it will look tacky and let me tell you, Super Junior might wear really weird outfits but some of them are really cute and most definitely not tacky!
2) Take a thin black brush and draw two lines to paint a collar on it
3) optional Top coat
かわいいです
Left Ring Finger- wow this is a lot. Opening scene (the first 20 seconds)
1)  Look at the picture first! Using a nail brush with black paint on it paint a circle then from that draw the curvy lines- look closely at the MV or my picture to get this right because where they begin is important as well as the angle

2) Paint your silver right over the black (which should be dry) leaving the circle white
3) Take a toothpick and trace it over the black lines- which should be visible if you used the right color- In the picture my black came off because I was in a hurry and didn't let it dry, don't do that!
4) Top coat


Left Pinky
1) The easiest one on this hand, just paint a little black heart on it and remember what I said about the top coat. The black Kiss nail polish is liable to stain if you use the top coat so consider carefully!

Right Thumb- Saranghae
1)Look at the picture. Now paint the Saranghae in white like I did. Paint the heart in white and add some flower petals around it (optional)
2) Paint red over the heart and random flower petals
3) Top Coat
Right Index, Middle, and Ring finger (condensed!)
1) Paint 'Y' on your index finger (Y as in Y is this post so long? It's because I am that good), paint 'P' as in this nail artist is Perfect on your middle finger. Paint 'S' on your ring finger. Y? Because I Said So. (can't help it, my creativity is bubbling up. It's like a can of sodapop that gets shaken up and handed to you by a friend who really cares  ^_^)
Pinky- Bleeding White Heart (there's all kinds of hearts in the MV)
1) Paint the white heart first, paint it so the tip is ragged
2) Paint 4 drips that look like spilled liquid dropping to the floor. Put two of them by the bottom of the heart and the other two like rain drops falling from the left curve of the heart.
3) Paint one  dot above the right side
4) Topcoat is okay on this one as there's not a whole lot of white- If the red stains then that should be fine, it makes it look even better in some cases.

슈퍼주니어 메니큐어 !!! ^_^

귀여워

반짝여요

If you paint this and make a video for Youtube, please credit my blog with the link!
감사합니다! ^_^

さくら Cherry Blossom Tutorial


さくら Cherry Blossom Tutorial

The colors you need

This nail art design was inspired by this Japanese woodblock print- the branches of your trees can be modeled off the picture itself if you want but I usually flip it around so the stroke order is more comfortable

Tutorial

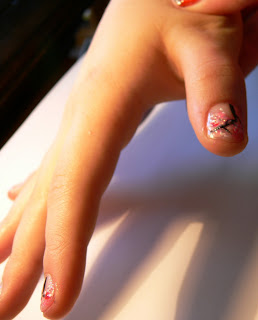
1) Paint your nails with a base coat of clear polish then put a light pink over it
2) Use a thin brush with black on it to paint branches
3) Put dots of pink sparkle next to the "branches" you painted
4) Paint some hot pink and white dots next to/on the pink sparkles- use a Q-tip to blot it so it looks more like flowers
5) Make sure it's dry then apply a top coat
*If you messed up really badly then take the white or the pink and with a tiny brush paint some flowers on the left bottom and right corner of the nail design to make it look more like cherry blossoms.
Finished look!

Alternatives

- Another alternative is to paint the base coat an off white frosting color or a shiny pearl (Tokyo Pearl by Sinful Colors is excellent)  however most people say they like the pink base coat best ^_^
-To make this nail style even easier just forget about hot pink and white and use the pink sparkles (this will look especially good with the pearl base if you chose that)


Wednesday, June 5, 2013

Asian Nail Art

Trust me, you haven't seen this kind of style anywhere else. I have spent so much time of my life looking for nail designs inspired by Asian culture and a lot of what I've seen- um no, a Chinese food carton doesn't portray what Asian style is- no matter how cute it looks! Tell me, have you seen a nail design claiming to be Asian like this before?
That's a koi魚(fish): common to Asian style gardens and art.(koi are beautiful fish!)


The clouds were inspired by a Chinese style of painting and that character is read as dragon in Japanese

So obviously the penguin was not Asian influenced :), but the ring finger on the other hand has a design inspired by a Japanese Kokeshi doll as well as two Chinese characters and cherry blossoms さくら. 
Asian pop culture manifests itself as well with a lot of the designs I paint- I try to avoid stereotypical symbols of Asia and prefer instead to create designs based off Asian drama, music videos, music, art, and language in my own unique way. For MV designs usually no two fingers are the same!

In case you wondered where else the Asian influence comes in I have been studying Japanese for a while as well as Korean and because of Japanese I know over 150 Chinese characters. So you will be seeing some Asian words followed by English words because the Asian vocabulary sometimes comes faster to mind- and looks better!
Another thing to mention besides the number of people who want to pay me for the nail styles I do (you get to learn how to do them for free! I think I might get jealous) is that when you comment you can request nail style tutorials and we'll see what I can do to help.

I promise- there's a lot more to come! ^_^